Wednesday, May 2, 2012

Final Project

For my final I revisited what I did for the midterm.  First, I learned how to build a skeleton and rig the model.  That lead to me having to use the paint skin weights tool.

I ran into a few big problems while working on my final.  I tried to hid the model's fur at some point while working on it, but instead accidentally deleted it, and didn't figure it out until I was done rigging.  I was able to get the 'suit of fur' from a previous save, and place it on top of the model.  I couldn't get the fur to bind to the skeleton (which at the AAUGA demonstration, I figured out it was because I had a bunch of soft modification handles that were getting imported into my file with the fur).  All I had to do to fix that problem was delete all by history, and then I was able to bind the fur.  My next issue was the the fur deformed when I moved the model's joints (it actually deforms the exact same way the skin used to before I weighted it).  The logical way to fix this issue would be to weigh the fur, but I couldn't figure out how to do that.

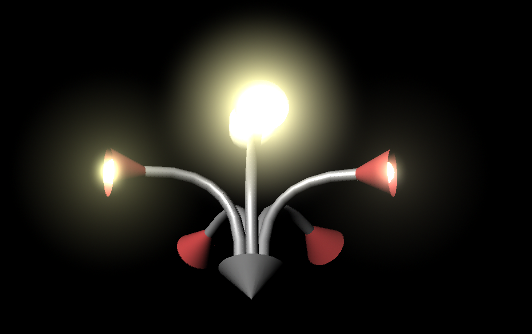
Because I spent so much time trying to fix my skeleton/rig, I wanted to move on to other things.  I improved the environment from what it was at during the midterm, and also added some clouds.

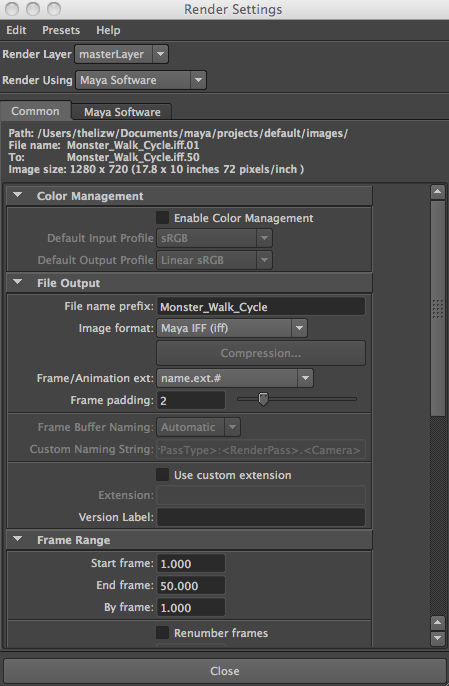
I then animated my character to be doing a walk cycle.  I'm still currently figuring out how to get a video of my animation.  I ran the batch render, and it finished after about three and a half hours (it took so long because the environment was so large, I believe).  Maya is now saying that it cannot open the files.  I have 50 .iff files (for 50 frames of animation), but don't know what to do with those.

Here are some screenshots of my process:


Autodesk Animation User Group Association Response

Recently, we attended an AAUGA meeting.  I thought all of the presentations were really interesting.

I didn't necessarily understand what the presentations were being given on, but it was still cool for me to see what I could be working on in regards to animation in the future.  I want to go into animation for a living (preferably for video games, but movies are also a possibility).

My favorite presentation was when they used an Xbox Kinect to scan the host into maya, creating a quick model.  I would like to start working with that in the future--I feel as if this method could do a lot for my work.

I liked that all of the presenters were so willing to answer questions, too.  I was having an issue with my model, and one of the presenters gave me a suggestion and put me on the right tract towards fixing it.  Over all, I really liked AAUGA, and see myself getting more involved as I get more experienced with Maya.

Illuminating Data Response

I really liked the Illuminating Data Exhibition.  Generally in the main studio in the AIMM building, there are fine arts related exhibitions.  I enjoy those (I was an art major before I switched to Interactive Multimedia), but it was nice to see an IMM based show in the main gallery.

It was also really neat for me to see art and IMM colliding.  Even though they are both very creative majors, I feel that the two don't intersect nearly as often as they should.  I know with my IMM work at least, I try to incorporate my fine arts background to the best of my ability (whereas a lot of my IMM friends don't seem to be that interested in fine arts).  

My favorite piece in the exhibition (though I can't remember the name of it) was the piece about the massive multiplayer online first person shooter (or MMO FPS).  A live recording of individuals playing the FPS was streamed onto a TV.  Each time a player died in the game, fake blood squirted one of the walls of the gallery (which eventually created a pool of blood on the floor).  

Thursday, March 8, 2012

Monster (Midterm Project)

My idea for Monster stems from my desire to make video games.  This product is the rough version of what I hope to turn into a (computer) video game that will make you think about life.  You will play as Monster, in his world.  You and Monster know that he has good intentions, but because of his appearance, most of the others in his world are afraid of him.  Some will immediately attack you, others will run or hide.  Your reactions towards the other people of his world determine how Monster grows as a being.  Fight back towards people who are trying to hurt you, and Monster will begin to look more and  more monstrous (his behavior will be linked to his appearance, which technically would be more of a metaphysical representation).  Simply ignoring the others isn’t enough--everyone is afraid of Monster, and as you travel further and further, your enemies will become more and more hostile.  The only way to save Monster is to be undeniably good to everyone around him.  One wrong move can set you back a great deal.  It will take a lot of good deeds to win over those around him.  

Sketch and "storyboard" (explaining that the model will be still and the camera will be moving around it).

Early render of the model. 

Some more progress.  Also added polar bear fur but gave it different coloring. 

Finished model. 

Starting to add environment. 

Finished environment. 

Camera along a motion path.  


Enlarged the motion path and switched into the camera's perspective.  

Rendered view from the camera's perspective. 

Expanded the environment and the motion path to gain a better perspective.  


Overall, I’m happy with the way that my project came out.  For the final, I’d like to work on rigging him and animating the actual character, though.  I do feel that I didn’t have the necessary skills to do everything that I wanted to do.  I think if I had a better grasp of Maya, that this project would have come out differently, but am not sure how it would have looked (since I don’t know what the skills are that I’m lacking in the first place).  That, of course, will come as I gain more experience with animation and modeling.  I’m still learning the capabilities of myself and the program, basically.  But as far as my current capabilities go, I’m pleased with how everything went. 


Wednesday, February 15, 2012

Wine Glass

Assignment: Create something using curves

Used the bezier curve tool to create this in the orthographic front view

Revolved it

View #2

Rendered view so far

Added shading using the blinn option.  Used a very light blue, and made it mostly transparent for the top.  The bottom was the same color, but less transparent.  

After shading

Final rendered view

Thursday, February 9, 2012

Ceiling Lamp

 Started with some curves in the orthographic view, then revolved them (this is an image from a tutorial that I based my design off of, I don't have the original screenshot).
Tutorial: http://www.creativecrash.com/maya/tutorials/modeling/nurbs/c/ceiling-light

 What happened after I revolved everything, in exception to the arms.  I placed a circle next to the curve for the arm and then hit 'extrude.'

 After coloring.

Added oblong-shaped spheres in each red container, then added a light glow.  This is the rendered view.